Setting up a Linux Mint 17.1 Xfce 4.12 PC
For my future reference1 here's how to set up and configure my Linux Mint 17.1 Xfce 4.12 system on BlackBeast Mk III. These notes have already helped rescue me several times during earlier misadventures with the initial Mint 17.1 MATE desktop. And an "iffy" 240 GB SSD. And a recalcitrant nVIDIA GTX970 graphics card (now, I hope, enjoying life in a Windows system across the village). Not forgetting an initially reluctant 40" Philips 4K monitor, either. That could (it transpired) be driven by the motherboard's integrated graphics chippery, but only at a 30Hz refresh rate. To get 60Hz needed its DisplayPort 1.2 input and the "Ultimate Fanless" Sapphire Radeon graphics adapter (nicked from BlackBeast Mk II), plus a proprietary driver from ATI that hasn't initialised properly.
Xfce 4.12 has yet to make it into the Mint repository, but you can find it here:
sudo add-apt-repository ppa:xubuntu-dev/xfce-4.12
sudo add-apt-repository ppa:xubuntu-dev/extras
sudo apt-get update
sudo apt-get dist-upgrade
Of course, you can't upgrade to Xfce 4.12 until you have your Linux Mint 17.1 system up and running... Just sayin'.
The Linux system volume (sda1)...
... is a single partition on a 480 GB SSD. Rather than fiddle with boot, root, and swap2 partitions, I just let the installation go ahead and use the entire space on the disk. Linux mounts it at /dev/sda1 aka "/" (root):
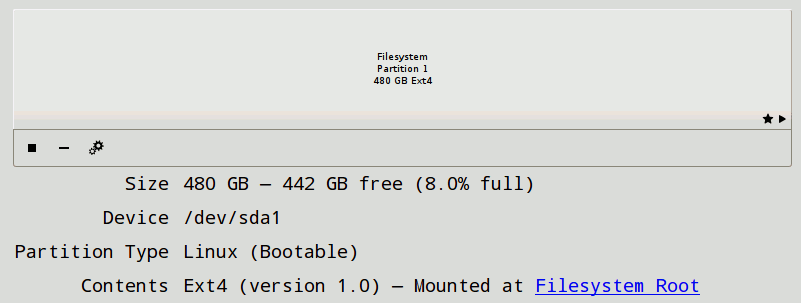
Buried somewhere on this device is my /home playground with around 418 GB spare (so far!) "Those who know" both swear blind "This is (far) more than you'll ever need for Linux."
/data (sdc1)
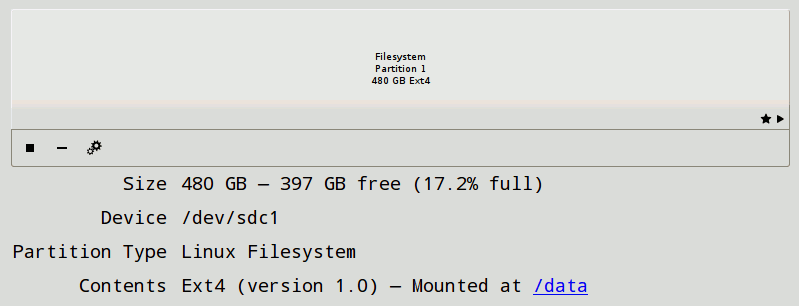
Is a useful 480 GB supplement to the space I have in /home on the system disk. /data is currently holding user data from my previous Win8.1 Pro system. There are two bad sectors on this SSD (I shall try to tread lightly on them!)
/backup (sdb1)
Is, I hope, self-explanatory
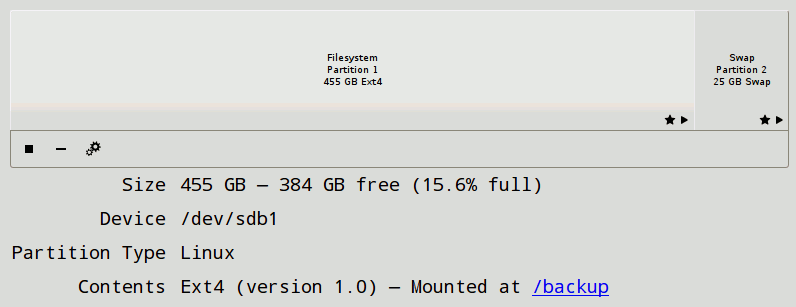
I resized its original 480 GB partition, shrinking it to make room for a /swap partition. The /swap used to live on the 240 GB SDD that I've now physically removed from BlackBeast (though I'd originally left this SSD3 hooked up for possible use [in extremis] if and when I managed to crash the "real" system).
fstab entries
Linux mounts these drives wherever you tell it to. Use "fstab" in /etc to define where to mount these three SSDs, and the /swap partition:
# /etc/fstab: static file system information.
#
# Use 'blkid' to print the universally unique identifier for a
# device; this may be used with UUID= as a more robust way to name devices
# that works even if disks are added and removed. See fstab(5).
#
# <file system> <mount point>   <type>  <options>       <dump>  <pass>
# / was on /dev/sda1 during installation
UUID=fb3a4c9d-1bb2-4175-b9c2-ad9a6bc3c672 /               ext4    errors=remount-ro 0       1
# new swap is now on /dev/sdb2
UUID=af61ebe8-7d74-4590-b8dc-4d92dfe78b43  none           swap    sw              0       0
# /dev/sdb1 contains backup data
UUID=222c04e5-277c-4b03-905a-30fc9bcb7027 /backup         ext4    defaults        0       2
# /dev/sdc1 was windows main data
UUID=97033468-aa92-421d-906d-fa3e2cedd1f7 /data           ext4    defaults        0       2
#
The only reason I'm not quoting the UUID string for the /swap partition on /dev/sdb at this point is that I don't yet know how to find it.
Solved: the magic spell is:
david@blackbeast ~/Desktop $ cd /dev/disk/by-uuid
david@blackbeast /dev/disk/by-uuid $ ls -l
total 0
lrwxrwxrwx 1 root root 10 Apr  9 18:05 222c04e5-277c-4b03-905a-30fc9bcb7027 -> ../../sdb1
lrwxrwxrwx 1 root root 10 Apr  9 18:05 97033468-aa92-421d-906d-fa3e2cedd1f7 -> ../../sdc1
lrwxrwxrwx 1 root root 10 Apr  9 18:05 af61ebe8-7d74-4590-b8dc-4d92dfe78b43 -> ../../sdb2
lrwxrwxrwx 1 root root 10 Apr  9 18:05 fb3a4c9d-1bb2-4175-b9c2-ad9a6bc3c672 -> ../../sda1
And I've just amended the "live" fstab to reflect this. So when I can afford to add a new SSD to replace the excised 240 GB one, this could cause the /swap partition to change its current /dev assignment from "sdb2" to "sdx2". (Where "x" is an unpredictable letter.) With a UUID identifier, this wouldn't matter.
Access to my two NAS drives
That "fstab" can also be persuaded to mount the two NAS drives — and provide clickable links to the various subfolders of them — all without the previous fuss of an autofs installation. It just needs a little bit more work. Take NAS #2 (for example). This is my newer Synology unit, containing a 4 TB RAID1 pair of spinning rust disks. Its network address is 192.168.1.67 and it has three top-level data folders — "Music", "Photos" and "Videos".
- Create a hidden folder (hidden, just to keep it out of sight so I don't do anything silly to it) called ".creds" in /home/david
- Create a "credentials" file called "NAS_TWO.creds" in this (hidden) folder
The credentials file (one for each NAS, of course) contains just two lines — the same username and password with which I login via its web interface when I want to inspect it or check for updates:
username=admin
password=(my secret password!)
Next, create one directory for use as the mount point for each top-level data folder. I created these under /NAS in the root directory "/" (again, to keep them where I won't trip over them or do anything silly to them). So, for example, the Music folder on NAS #2 is mounted at /NAS/NAS_TWO/Music and I have a symbolic link to it in /home/david/NAS_TWO
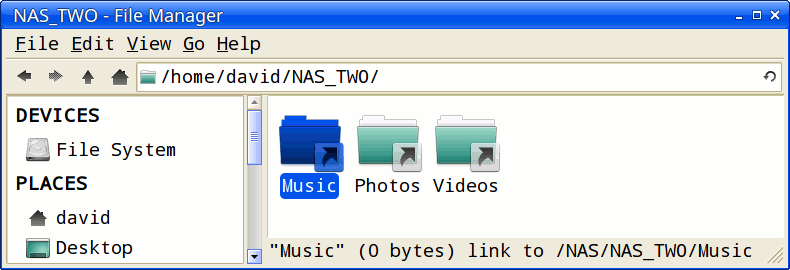
When I click on it, the NAS spins up (if necessary) and then I can see the contents of the "Music" folder on NAS #2.
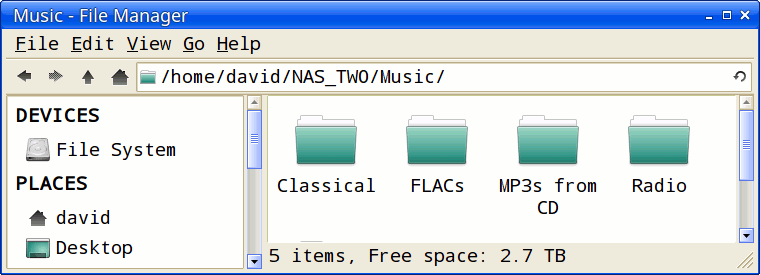
Finally, define each of the top-level folders on each NAS device in /etc/fstab as here:
#
# Samba shares for Synology Nas One (3TB white)
//192.168.1.98/Documents   /NAS/NAS_ONE/Documents    cifs credentials=/home/david/.creds/NAS_ONE.creds,iocharset=utf8,sec=ntlm 0 0
//192.168.1.98/Molehole    /NAS/NAS_ONE/Molehole     cifs credentials=/home/david/.creds/NAS_ONE.creds,iocharset=utf8,sec=ntlm 0 0
//192.168.1.98/Music       /NAS/NAS_ONE/Music        cifs credentials=/home/david/.creds/NAS_ONE.creds,iocharset=utf8,sec=ntlm 0 0
//192.168.1.98/Pictures    /NAS/NAS_ONE/Pictures     cifs credentials=/home/david/.creds/NAS_ONE.creds,iocharset=utf8,sec=ntlm 0 0
//192.168.1.98/Podcasts    /NAS/NAS_ONE/Podcasts     cifs credentials=/home/david/.creds/NAS_ONE.creds,iocharset=utf8,sec=ntlm 0 0
//192.168.1.98/Videos      /NAS/NAS_ONE/Videos       cifs credentials=/home/david/.creds/NAS_ONE.creds,iocharset=utf8,sec=ntlm 0 0
# Samba shares for Synology Nas Two (4TB black)
//192.168.1.67/Music       /NAS/NAS_TWO/Music        cifs credentials=/home/david/.creds/NAS_TWO.creds,iocharset=utf8,sec=ntlm 0 0
//192.168.1.67/Photos      /NAS/NAS_TWO/Photos       cifs credentials=/home/david/.creds/NAS_TWO.creds,iocharset=utf8,sec=ntlm 0 0
//192.168.1.67/Videos      /NAS/NAS_TWO/Videos       cifs credentials=/home/david/.creds/NAS_TWO.creds,iocharset=utf8,sec=ntlm 0 0
If you finalise the fstab table before you've created the mount point directories (my mistake first time I did it) you end up with a mess of unmounted stuff on your desktop and it's all locked to root, which is both unhelpful and, frankly, depressing. Don't do it.
Current top-level contents of /home
And here we are:

The first item (bin) is a hangover from an initial attempt to auto mount the NAS drives. The second item (data) is a symbolic link to /data on /dev/sdc1.
Setting up a webserver on Localhost
I've described here the steps needed to get lighttpd up and running as a service on BlackBeast to do all my local web page serving inside the firewall. (In addition, that is, to the lighttpd server also running on the Raspberry Pi2 upstairs. Belt and braces, that's my philosophy.)
Application software
I've described here the various alternatives Linux offers to the set of programs I was using on Win8.1 Pro.
NOMODESET
How could one avoid a mention of my least favourite stumbling block? As part of the ultimately unsuccessful attempt to get BlackBeast to play nicely with an nVIDIA GTX970 graphics card (before stepping back to use the ATI Radeon "Ultimate Fanless" again) — all in pursuit of 4K resolution at a decent 60Hz refresh rate on my Philips screen — and in order to be able to boot the system to a working display (!) we had to add NOMODESET to the end of this line in /etc/default/grub
GRUB_CMDLINE_LINUX_DEFAULT="quiet splash nomodeset"
And then immediately run update-grub (as root) to update:
/boot/grub/grub.cfg
This was my eventual set of steps needed to get my Philips 4K display working at 60Hz refresh rate:
- Switch everything off
- Put back the Radeon graphics card, so Linux can detect it and potentially offer a new driver for it
- Switch on and reboot
- Open a terminal as 'root' and edit "nomodeset" back into grub, in /etc/default/grub since painful experience shows we will simply never get a working display without it
- Run update-grub (again, as 'root') immediately to reflect this alteration permanently
- Use the Driver Manager to select a proprietary ATI driver (instead of the open source one currently in use)
- Reboot, and keep hitting the 'del' key to enter the BIOS setup
- Reset the BIOS to use PCI slot 1 for its default graphics (instead of the motherboard's integrated graphics), PF10 to save and exit
- Just allow the reboot to resume
- Login at the start panel and admire the new 4K desktop display with its increased refresh rate
- Unplug the HDMI lead, and smile when the display stays on!
Unfortunately, although the system now boots cleanly to a beautiful display... a side-effect has been to stop the AMD Catalyst Control Centre from being properly initialised, and thus it is currently not possible to tinker with the settings of the graphics card... not even to the point of getting it to recognise what monitor screen it's driving. Although it thinks it's refreshing whatever it thinks it's driving at 88Hz.
The only sane response to this is to say "Bother" and put the kettle on. And that word "sane" brings me to...
Printing and scanning
My HP LaserJet Pro MFP 125a can print and scan under Linux Mint. Start by running "hp-setup" in a terminal to download and install a proprietary binary module that it needs from the HP web site. There's a well-illustrated walkthrough here. It helps if you don't forget to install XSane, too, of course. That plugin is used by the GIMP to "create" an image by driving the scanner and loading the scanned image data into GIMP's window, ready for you to work on.
Notes on get-iplayer
Again, for my future reference. The PPA keeps a more up-to-date version than the one currently tucked away in the Mint 17.1 distro.
sudo add-apt-repository ppa:jon-hedgerows/get-iplayer
sudo apt-get update
sudo apt-get install get-iplayer
The first line tells Linux about a personal package archive. get-apt will check it out for obvious problems, but only do this with something you trust. The second line tells apt to refresh its list of package sources. The third line installs get-iplayer and its dependencies (including rmtpdump).